Chimney Swifts: How to Handle These Summertime Visitors
Chimney Swifts are as fond as your chimney as you are (perhaps even more so) and could be planning a visit quite soon. As a chimney owner in the Indiana region, it is important that you are informed about these birds, their nesting patterns and the safety procedures to carry out if/when you encounter them in the coming summer months.
About Chimney Swifts
These peculiar little birds (often described as looking like “cigars with wings”) spend almost their entire life in flight; they cannot perch upright when they land and must cling vertically to trees or walls. Pre-industrialization, Chimney Swifts nested and roosted mostly in hollow trees and caves. As their natural habitats were destroyed, these adaptable birds found satisfactory substitutes in chimneys. Chimneys serve almost as man-made replicas of the Chimney Swifts’ hollow nesting trees.
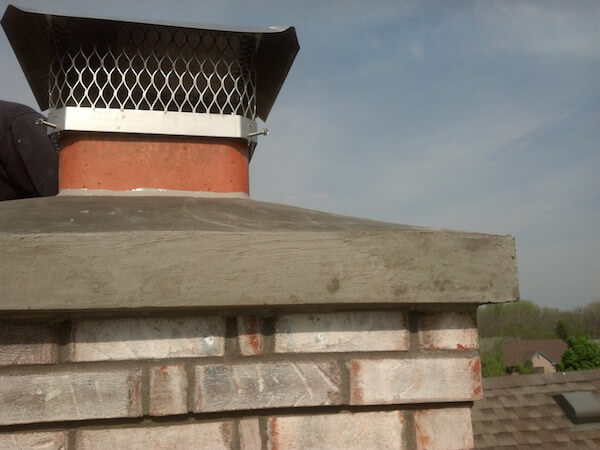
In the summertime, Chimney Swifts return from South America and migrate back to Indiana and the eastern United States for their breeding season. Breeding season is nesting season, and these birds will be making their homes in any available chimneys. Most homeowners install chimney caps (something we advise you to do), which prevent the invasion of these and other creatures. However, if your chimney does not have a cap, you may find a family of Chimney Swifts has moved in with you for the summer.
Removal
If you find that Chimney Swifts have housed themselves in your Indiana chimney this summer, consider hosting them for the time being. Typically, their eggs will hatch, you will experience some noisy young fledglings and then, within about two weeks, they will remove themselves. At this point, you can have your chimney swept and install a chimney cap to avoid housing other creatures in the future.
If you have some Chimney Swift boarders and are not feeling particularly hospitable, do not attempt to disturb them or remove them yourselves. Chimney Swifts are protected by the federal government under the Migratory Bird Treaty Act. The statute makes it illegal to disturb the birds, their young, their eggs or their nests during the breeding season. These birds are beneficial to the environment and helpful insect eaters. Their numbers are in decline, and it’s important to avoid harming them.
Only a professional with a permit can safely and legally remove the birds and nests. Contact your local animal control services or Humane Society to request professional advice and help with the removal of the Chimney Swifts. Once the Chimney Swifts have left your chimney — either on their own or with a professional — it is important to have the chimney swept, cleaned and capped to prevent any further altercations with the birds or any other creatures. Don’t worry; these birds will not be left homeless. Members of the Chimney Safety Institute of America, National Chimney Sweep Guild and other organizations construct nesting towers to provide more suitable housing for the Chimney Swifts. Chimney sweeps are fond of Chimney Swifts and want the birds and chimney owners to be safe and happy.

5 Up-and-Coming Urban Neighborhoods in Indy
The housing market in Indianapolis began to rebound about three years ago. However, recently the market has boomed to incredible heights. Urban Indy neighborhoods that were once deteriorating are undergoing waves of revitalization. Young professionals, new families and empty nesters alike are seeking homes near the excitement of downtown living. While the Chatham Arch & Mass Ave, Broad Ripple Village and Fountain Square areas have experienced consistent and growing popularity, new trendy pockets are appearing on the Indianapolis map all the time. The following are five, slightly lesser known, up-and-coming neighborhoods for real estate buyers interested in a modern, urban lifestyle.Read more

Chimney Leaks: Prevention and Repairs
As a homeowner, you understand the seriousness of the words “water damage.” In fact, that phrase might even physically repulse you. If your basement was flooded, if your ceiling was leaking, if any other area of your home was suffering water damage you would act immediately to repair that damage and prevent future problems. Why, then, do we not feel the same sense of urgency and diligence when it comes to our masonry chimneys?Read more
Preparing a House for Sale
Every seller wants his or her home to sell for a good price and as quickly as possible. However, that won’t just happen on its own. To achieve this requires careful preparation and a lot of work. Too many sellers fail to make any changes to the property and are then left sitting on the market for weeks. If you’re thinking of taking advantage of the spring/summer season to sell your home, the following tips should help make it a marketable gem attractive to buyers.
Be Objective
The first step is to stop thinking of the property as your home. Your home is now a house for sale, and your wonderful new home is waiting for you somewhere else. Of course you are sentimentally attached to those curtains you put up when you were first married and that painting your child made at school. However, you must put that sentimentality to one side and look at the property objectively. What are the house’s strengths and weaknesses? What is appealing to you, and what will be appealing to potential buyers? You want buyers to be able to imagine themselves in the space, and that will require removing some of your own personality from it.
De-personalize
Speaking of personality, the first step is to de-personalize your space. Pack up all your personal photos and memorabilia. You want buyers to be able to imagine their own photos on the walls. In fact, you may find it useful to rent a storage unit in which to keep some of your belongings and furniture while you stage your house for sale.
De-clutter, De-clutter, De-clutter
This is perhaps the most important step. Clutter is a natural part of any home — shoes by the door, children’s toys strewn about the floor, clothes you haven’t managed to put away just yet. However, clutter is a turn-off; it makes buyers think of cleaning and distracts from the attractive features of any space. Find new units of organization and put any excess items into storage.
Make Repairs
Touch up any chipped or marked areas of paint. Consider repainting any bold room in a more neutral color. Replace cracked tiles. Patch any holes. Fix leaky faucets and jammed doors. Replace every burnt out light bulb. Essentially, take care of any cosmetic needs the house may have. The buyers will notice.
Clean
Make sure you perform a deep cleaning of the house. Have carpet stains removed. Wash windows inside and out. Replace dirty grout. Pressure wash sidewalks and decks. Organize the closets, cabinets and fridge. Replace any dingy towels, carpets or bedding. Scrub and polish every surface. In addition to the deep cleaning, make sure you touch-up with vacuuming and dusting every day to keep everything looking it’s very best. You might even consider hiring a cleaning crew for some extra help.
Landscape
Don’t forget to pay as much attention to the outdoors as you do to the indoors. Your lawn is the first impression buyers will have of your house, so curb appeal is critical. Weed. Plant flowers. Mow the grass. Repaint the front door and shutters. Give the property a nice face-lift.
Stage
Lastly, you want to add the finishing decorative touches to ensure that buyers will love your space. Make sure that every room has a defined purpose — whether or not you actually use the room for that purpose. Try to make every space look as big and bright as possible. Remove much of the furniture to storage. Draw back the drapes. Add some mirrors for the illusion of even more space, and try to stick to a light, neutral color scheme. Then, add the finishing touches. Bring in plants and fresh flowers. Scented candles add a nice touch. You could even bake some cookies!
All of this may seem like a large investment of time, effort and even money. While that is true, it is worth putting in the work and preparation to make your house look its very best. You will be more than rewarded when a buyer falls in love and makes you the offer you deserve!
Poultice Creosote Remover: A Handy Product to Help Keep Your Chimney Clean
Where there is a chimney, there is creosote. This black, tar-like residue is an inevitable byproduct of wood burning. Creosote builds up in the chimney flue over time, so it is important that it be cleaned and removed regularly. The substance is highly combustible and could potentially lead to dangerous flue fires.
First and second-degree creosote is a powdery substance that can be brushed clean with a professional chimney sweep. However, third-degree creosote develops into a hard glaze that cannot be removed with even the highest quality brush. A rotary head with chains is capable of removing the creosote, but that method is dangerous and can damage the flue itself. In fact, when homeowners are faced with this problem, many opt to simply remove the flue liner rather than attempt to remove the glaze itself.
Poultice Creosote Remover is a fairly new product that helps get rid of the headaches of third-degree creosote. This chemical product produced by Saver Systems safely and effectively removes the glaze with little inconvenience. When applied, Poultice Creosote Remover dissolves and absorbs the creosote, breaking down its strict adhesion to the sides of the flue. Most of the creosote then falls down from the flue, and any remainder can easily be brushed off with a normal sweep.
This revolutionary product eliminates the necessity of other, more dangerous and destructive removal methods. It is certainly a great help to chimney owners and chimney sweeps. However, third-degree creosote build-up should be avoided, if possible, in the first place. Regular chimney maintenance and cleaning can help prevent extreme build-up and is critical for every chimney owner.
Chimney & Masonry Outfitter can provide regular maintenance for your fireplace and chimney. Our professionals can remove creosote build-up, of any degree, particularly with the help of Poultice Creosote Remover. Call today to set up a regular maintenance schedule.

Different Types of Chimney Dampers
Chimney dampers either open your chimney to or seal your chimney from the outside elements. They serve as a sort of “gateway” between your home and the outdoors. When your fireplace is in use, an open chimney damper ensures a proper draft and the ventilation of smoke. However, when your fireplace is not in use, it is important that your chimney damper seals properly in order to keep heating and air conditioning from leaving the house. This blog explores the different types of chimney dampers. That way, you can choose the right damper to protect you from unwanted drafts and “sky-high” heating and cooling bills.
Dampers are either located at the top of the chimney or at the throat just above the firebox. Traditional masonry fireplaces typically have a cast iron throat damper. However, these traditional cast iron dampers do not make for great sealers. The metal of the damper on the metal of the frame allows some air to flow to and from the house. This problem only gets worse after several years of corrosion. There are a few kinds of aftermarket chimney dampers that can supplement a traditional cast iron damper and effectively seal the home from unwanted airflow.
Chimney Top Damper
Top mount chimney dampers are located at the top of the chimney. These dampers serve as both a protective chimney cap and an energy-saving sealer. They consist of a metal cap or gate that opens and closes by means of a steel cable and lever inside the fireplace. These dampers usually have silicone rubber gaskets to provide leak-proof seals and metal mesh guards to prevent animal entrance. These dampers are durable and provide a seal for the entire chimney flue. However, their metal components may experience some weathering over time, and they can sometimes slightly restrict the flue, preventing a proper draft. In addition, top mount dampers can be somewhat more expensive than other types of dampers and can be more difficult to install.
Throat Dampers
Throat dampers are installed at the lower end of the chimney flue — either below or above the original damper. These dampers consist of inflatable seals that fill up like a balloon to plug the flue and deflate when the flue needs to be open. Inflatable throat dampers are typically less expensive and easier to install than top mount dampers. They come in many sizes and are easily “adjustable” to different flues. They are also very easy to use. However, throat dampers do not prevent animals, leaves and other unwanted outdoor souvenirs from entering the flue. Furthermore, inflatable dampers can be punctured or easily forgotten about when starting a fire.
Seals for Metal Fireboxes
As opposed to built-in masonry fireplaces, pre-fabricated metal fireplaces have front vents and flue pipes with flapper valves for opening and closing. However, especially over time, these valves do not always seal perfectly well. Additionally, the front vents can sometimes allow unwanted airflow. The solution for these metal fireplace problems is magnetic covers for both the vents and the valves.
There are different advantages to each type of damper and choosing the right one for your home depends upon your specific needs and preferences. Whichever damper you choose, professional installation will ensure that you successfully seal your flue and your home. Don’t hesitate to contact your friendly neighborhood Chimney & Masonry Outfitter for any assistance in selecting and installing the perfect damper for your fireplace.

Meet Miles!
Meet Miles: B+E's Outfitter of the Month for May
 Miles is the Director of Operations here at Brick + Ember Outfitters. He has played a crucial role in the growth and organization of our company. He is thorough and goes above and beyond month after month. Miles went to Wabash College and currently lives in Indianapolis.

Is Spring Really the Best Time to Sell a House?
General wisdom tells us that spring is the best time to sell a house. Logic seems to support this idea, particularly if you live in a climate with hot summers and cold winters (like Indiana). The warmer weather and longer days draw people out, increasing traffic to open houses. In addition, many people with children hope to buy a home and make that transition over the summer, so that the school year is not disrupted by the move.
That said, some real estate agents argue that the fall/winter off-season can be a good time to sell as well. Although you are typically dealing with less industry and fewer buyers, the buyers who are looking tend to be serious. While you get much more foot traffic in the spring, many of those visitors tend to be mere window-shoppers or looky-loos. So what’s the answer? Is spring really the best time to sell a house? Let’s find out.
Selling in the On-Season (Spring/Summer)
Advantages:
- Higher Sale Price: In most other markets, higher inventory means lower prices. Counterintuitively, it is the opposite in the housing market: when inventory is high, prices go up. Because there are so many more buyers in the on-season, the supply of houses relative to the demand is actually lower than in the off-season. This drives sale prices up, which is good news for the seller.
- Better Valuation: When a house is being valued, an appraiser will reference comparable houses in the neighborhood. However, if the most recent data shows that comparable houses sold more cheaply in the off-season, the house will be valued at a lower price. To receive a better valuation, it’s best to wait until a few houses have sold nearby during the on-season for a more favorable comparison.
- Better Curb Appeal: Spring is the season of daffodils and tulips. Potential buyers out enjoying the weather will be drawn to a house’s inviting landscaping and curb appeal.
- Bidding Wars: When inventory is high and buyers are plentiful, there is a greater chance that a home will receive multiple offers. A bidding war attracts potential cash buyers and deters buyers from making repair requests or demands. Ultimately, the seller wins out.
Disadvantages:
- Pickier Buyers: With higher inventory, buyers can afford to be picky. In the on-season, buyers may be less willing to compromise on their wish lists. A house will likely be competing with many other beautiful houses, and, if work is needed, buyers may simply pass.
Selling in the Off-Season
Advantages:
- Motivated Buyers: There are arguably far fewer looky-loos in the off-season. Most buyers shopping for homes in the fall and winter (particularly close to the holidays) are doing so out of some kind of necessity. Facing any number of pressures, these buyers will be serious about making an offer.
- Less Competition: Although low inventory generally drives prices down, in certain circumstances it can work to a seller’s advantage. If there happen to be enough buyers competing over a small number of houses, bidding wars can occur.
Disadvantages:
- Less Curb Appeal: Once winter rolls around, houses just won’t be looking their best. Bare trees and dead lawns don’t have the same attraction as colorful flowerbeds.
- Lower Sale Price: As stated previously, lower inventory, lower prices. Though this can be circumstantially avoided, it generally holds true.
- Thrift Shoppers: Many buyers are aware that sale prices go down in the fall and winter and that off-season sellers can be quite motivated. These thrift shoppers are out looking for a deal, and sellers will likely have to field some low-ball offers.
Many people say that spring is the best time to sell a house, and, as it turns out, there is some truth behind that belief. The on-season housing market is advantageous to sellers. Of course every local market has its particular idiosyncrasies. It’s worth considering all the circumstances when selling. Who knows? December 24th could be the right time to sell for someone.
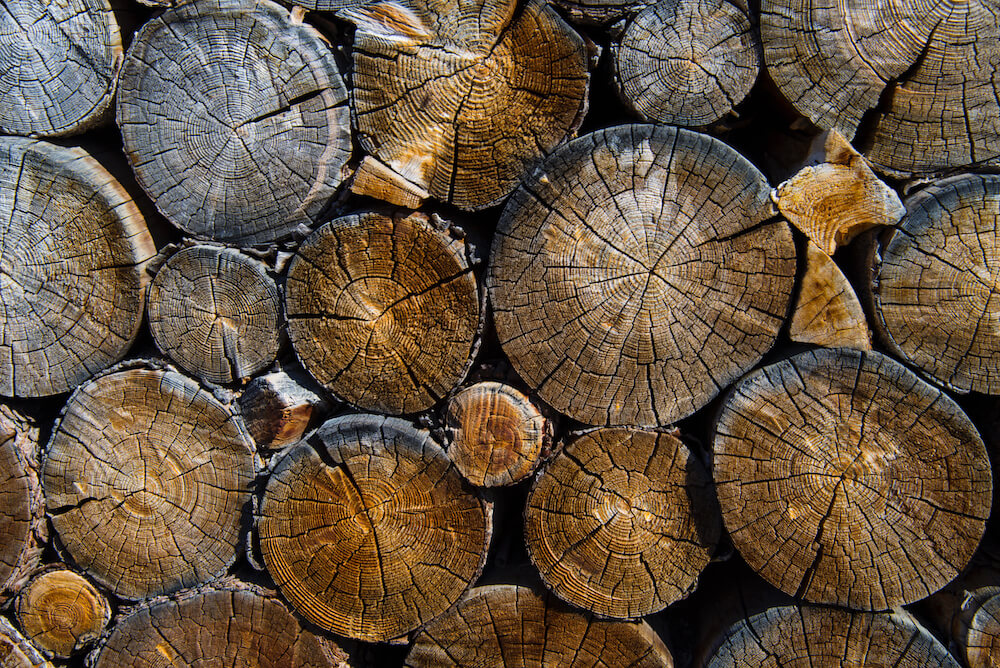
Wood Storage Tips
As warmer weather approaches, you may find yourself using your beautiful fireplace a little less frequently than you did during the chilly winter months. Although you will probably find yourself gathering around the hearth during brisk nights all year round (Indiana weather, am I right?), this is the time to start thinking about storing your firewood. It’s important to optimize your wood storage system so that you can correctly preserve your wood and have a reserve ready when fall rolls around again. The following are a few helpful tips for storing your firewood safely and efficiently.
Outdoor Storage:
Find an Ideal Location: For convenience, it can be helpful to store your firewood near your home. Firewood can be heavy and difficult to carry, especially during the colder months. If possible, make it easier on yourself by shortening the trip and keeping your firewood close to your home. If there are no appropriate places to store wood near your home, consider investing in a wheelbarrow to help with transporting the wood.
When storing your wood outside, it is also important to choose a location off the soil. Firewood stored directly on the ground will rot quicker because of exposure to bacteria and moisture. Choose surfaces like concrete, asphalt or gravel instead. Outdoor storage sheds and garages, if available, can be ideal choices for firewood storage as well.
Protect Your Wood: There are several measures you can take to protect your firewood from moisture and bacteria. If you don’t have any available space that is off the soil, you can elevate your wood using sticks, a tarp or even 2 by 4 boards if necessary.
It’s important to protect your wood from above as well as below. The best way to do this is to lay a tarp over your firewood and secure it with ties or bricks. Make sure you leave the sides of your stack open to airflow to prevent the wood from drying out too much. Do not cover your wood with tarp before it is dry (unless you are protecting it from coming rain). You want your wood to dry out before you cover it.
Stack Your Wood Appropriately: Never just throw your firewood into a pile. Stacking your wood effectively will promote air circulation and help prevent the wood from rotting more quickly. Stack the wood neatly in rows. Avoid stacking your wood up against any walls when storing outdoors. Make sure that there are a few inches of space between your wood and your wall to protect your wood from moisture and bacteria.
Indoor Storage:
If you have the space, it can be very convenient and efficient to store your firewood in your home. Firewood lasts much longer when kept away from the bacteria and moisture of the outdoors. However, if you store your firewood indoors it should be fully dry. If you chopped or collected the wood yourself, store it outside until it dries out completely (this takes about six months). There are several optimal places to store wood inside a home; many fireplaces have compartments for wood storage built in. Otherwise, using an old trunk for storage can be a good option.
Check Your Wood: Even after you’ve followed these storage tips to a T, you should always check your wood before you use it. You don’t want to throw wet, rotting firewood onto the blaze. Dry firewood will be lighter than wet wood, and it will look gray with cracks along the edges.
Follow Regulations: Your state, city or neighborhood may have specific guidelines regarding the storage of firewood. You should look over local regulations to ensure that your wood storage is legal.
If you have any concerns regarding local regulations — or any other aspect of wood storage — your friendly Brick + Ember Outfitters would be more than happy to field your questions. Please don’t hesitate to give us a call so that we can help you store your firewood safely, efficiently and legally.

Tips to Help You Ignite Your Pilot Light
Knowing how to ignite a pilot light is a skill you should have at the ready in your “Homeowner’s Tool Kit.” This is particularly true if you own a gas fireplace. Luckily, the steps for igniting your fireplace pilot light are simple and straightforward, and we have a few helpful troubleshooting tips for when it doesn’t seem to be cooperating with you.
Here, are the basic steps:
- Locate Your Fireplace Controls: The controls are typically located behind a metal grate or plate on the floor of the fireplace or the front of the fireplace. Remove the plate to gain access. There may be some written instructions in your control panel. If not, you may find it helpful to keep a copy of these instructions there.
- Locate the Control Knob and the Ignition Button: The control knob will have the words “ON,” “OFF” and “PILOT” written on it, and the ignition button will typically be a red or black button.
- Ensure that the Control Knob is Set to “OFF”: If the control knob was not already set to “OFF,” turn it to “OFF.” Once you have set it to “OFF,” you should wait several minutes before continuing with the process. This allows the gas to dissipate.
- Light the Pilot Light: Once you’ve allowed the gas to dissipate, turn the control knob to “PILOT.” Then, while pushing down the control knob, repeatedly press the ignition button until the pilot lights. Keep pushing down the control knob for 30 seconds after the pilot lights and then gradually release it.
- Turn the Control Knob to “ON”: Once you have a sustained pilot light, turn your control knob to “ON.” And you should be ready to go!
If you have followed these steps but your pilot light is not igniting, there are a few troubleshooting measures you can take. First, when your control knob is on “OFF,” test the ignition button a few time to be sure that it is creating a spark. Next, ensure that the gas shut off valve leading to the fireplace is open. And finally, wait five minutes and retry the process. If the pilot has been off for an extended period of time, it may take a few minutes for the gas to reach the fireplace.
Seek Professional Help
If after troubleshooting, your pilot light still won’t light, there may be a more serious issue at the bottom of it. For your fireplace and your safety, it’s important to contact professionals who can identify and resolve the problem.
Brick + Ember Outfitters is committed to the safety and functionality of your pilot light and fireplace. We can set up an appointment for you to speak with one of our Outfitters who will schedule an on-site consultation and address any of your concerns.